Saturday, September 8, 2012

Frankenbike

My Art Bike is finally to the point that it can be ridden and enjoyed. I do foresee some fussing with in the future.  This started as part of a workshop for our Makerspace and has been backburnered for some time, only to be moved to the forefront by a request to join my friend and fellow maker Jeff in a parade this coming Sunday.

The bike is a Raleigh 26" bike front end and a kids coaster 20" bike at the back.  Bent steel tubing in the middle.  The handle bars are extended with some galvanized pipe I found in the dumpster at work.  The "head" is an old schwinn bike seat...hard to see but it's teeth are tiny skull beads.  I wrapped the handle bars in silver craft wire and also parts of the frame. 

Here is the progression of my frankenbike.
Pieces Parts


Together, only one peddle and two flat tires

Handles bars are bent and I trust it to sit on....

Pretty much complete, rides pretty well, not too squirrely.

A view from the front

The "hood ordainment"

Update: The parade was so much fun.  Afterwards we brought the bike and the derby racer to a local music festival that our Makerspace had a booth at (MannaFest).  The bike and racer were kid magnets.  We let them sit in the racer, and wheeled them around on the bike.  Enjoyed the entire day very much!


Saturday, June 30, 2012

3D and other felting treks


Expanding my felt play into 3D work is so exciting.  My first with using a relief was a beret style hat and from there a bell cloche hat.


A few days ago I experimented with making a cat cave.  It came out as planned but in the future will be adding more fiber as it could be a little thicker thus holding its form against rubbing cats.  It seems to have met approval, though if you look carefully I did have to lure him in with a bit of catnip.


I am looking forward to experimenting more with the relief process.(placing a piece of tarp, or thin packing foam between two layers of roving)

Also this week I have not abandoned the wonder of merino wool scarves and tried something new from a fellow felters blog post.  The results fun and airy.
Poppies 15"X22"

Decided to work on a new wall hanging as well. Inspired by the poppies that were covering my yard like a blanket.  I am in the process of planning out another with nebula in mind.

Sunday, June 10, 2012

Blacksmithing..

Spiral "flower" on rebar 
Ok, can't stand the snails in my garden,
but this one doesn't eat the veggies.

Cat tail made from pipe and metal rod.

I just finished my Art Metal class last Monday.  Brooks Collier is a patient and knowledgeable teacher and I cannot wait until the fall semester to continue with metals classes. There is something so exciting about turning metal to a pliable red in a forge, bending, hammering and shaping it. Sharing a few photos of some of the practice pieces from class.

Friday, May 18, 2012

Jellies...

This new piece is my favorite yet. Felting is like painting with wool and silk. It is fascinating, delightfully textural, and pure joy for me. This piece is 22" X 35". I will be making a bar hanger for it in my metal class on Monday evening, just picked up the flat bar to do so. Corriedale wool base, merino wool top, silk, mohair, wool yarn, hand dyed silk caps. The piece was inspired by the Jelly Fish exhibit at the Monterey Bay Aquarium.
Below are photos of part of the process.. laying out the layers, wetting, and rolling


Monday, April 30, 2012

My Recent Adventures in Metal


I have been taking welding classes through Placer School for Adults and enjoying it very much.  Just signed up for my third class~!


During the first class I made a few fun objects including this paleo-volcanic yard art from scraps, a dino accent for my heat stove and a spiffy amoeba napkin holder.
During the second class (that tonight is the last of six classes) I was required to design a project and then create it.  I chose a music stand.. I needed one and it seemed like it would be fun to make. Enter the learning curve .


finished but not "finished"
Still in two pieces
I used a piece of sheet metal that was in our shop at work for the top. Using a plasma torch I cut out the dragon fly design and with a bender gave it the lip for the music to sit on.
The base was made from four steel rods heated in the forge and twisted, the legs and top that would hold the sheet metal were also done in the forge by heating and bending.  Thanks to a great deal of help from  Brooks Collier the blacksmith teacher. 
The base was then welded onto the top.  I need LOTS of welding practice. I burned though and had to fill where it was attached.  Ok, fixable…

With Blue Patina

There were many places where the heat shield had come off and it was suggested I patina it.  Wonderful… however the instructions on the bottle are woefully lacking.  I cleaned the piece with isopropyl alcohol and used the spray bottle to apply.. did not like how it went on so went with the other suggested method and used a sponge.  Looked great until I found that it did not adhere to a variety of spots.  I cleaned it up in those spots and tried again.. however it had been in the sun and dried spotty.. crap… I have done all I can to make it look right and it is ok.. has a rather antique look (haha)  but will clear coat it and call this a learning experience.  I still am happy with my little music stand (my ukulele and I will have some sweet moments with it, of that I am sure) I am also grateful for all the lessons it has given me..  most of all patience and to slow down!

 And in ending this post I must say, I really like metal.. am amazed by how it can be manipulated and made into a thing of function and beauty,  I really really love fiber.Looking forward to finding ways of combining the two!

Thursday, April 19, 2012

Workshops at the Makerspace


Teaching, Facilitating, Sharing.. oh how I am enjoying this!  Probably the most, well not probably.. THE most fulfilling career I have ever had was when I was teaching. It feels so amazingly good to be back at it!  I love the scale and content as well.. teaching without the paperwork, grading,  administrative nightmares. 

My involvement in our Makerspace “The Curious Forge” has allowed me to offer workshops in Pineneedle Basket weaving, and Nuno Felting.  Will be offering one on Soft Circuit Sewing soon as well.

Just had to jot down how happy and grateful I am for these opportunities!


Tuesday, March 27, 2012

More adventures in fiber and felting.

 I was able to attend another felting technique class last week. This process is similar to the Nuno process, however it does not use fabric as a base.  The fabric is created from  wool roving and assorted bits and pieces that are fairly limitless.  I also have been trying out some hand dying of both silk and wool.  Most of my pieces thus far are experiments and learning opportunities, but as my knowledge of these fiber techniques and challenges grow I am becoming more and more excited by the possibilities.


 Center: Nuno Felted Silk
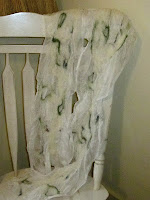
White silk with white wool merino roving with green accents
Left: Wet felted scarf with Merino Wool, wool yarn and silk thread accents. Hanging leaves
and a pull through.

Nuno Felted Wool on Silk Chffon, hand dyed.


Thursday, March 1, 2012

Nuno my Heart...

Wool design laid out on Silk for felting process
I thrive on new ways to create…. in doing so I feel alive. I also tend to bounce from project to project like a pinball or a distracted ferret!

This week, after my class being cancelled back in January, I finally got my hands on Nuno Felting! The class was held at The Tin Thimble at the packing sheds in Loomis. I love this little store, packed full of vintage fabric, buttons, luscious wools and fineries. Sharon, who gave the class is excited by the process, creative and encouraging. And as luck would have it, there was only one other student giving the four hour class a lovely pace.

Wool on Silk Nuno felted scarf
According to Wikipedia: Nuno felting is a fabric felting technique developed by Polly Stirling, a fiber artist from New South Wales, Australia, around 1992. The name is derived from the Japanese word "nuno" meaning cloth [1]. The technique bonds loose fibre, usually wool, into a sheer fabric such as silkgauze, creating a lightweight felt. The fibres can completely cover the background fabric, or they may be used as a decorative design that allows the backing fabric to show. Nuno felting often incorporates several layers of loose fibres combined to build up colour, texture, and/or design elements in the finished fabric.
Interested? Read more


I am itching to get at my stash of Merino Wool Roving, and my head is spinning with the possibilities of this technique mixed with metal, weaving and incorporated in my sewing and will add pictures as I play and dance with this new technique..

**this process is a little hard on the hands, recommend using gloves for part of the process.. I had small abrasions on my finger tips that did not concern me until my drumming group got together last night.. I was playing lost in a rhythm, when I looked down my drum head was covered in blood, ewww..we bandaged up my fingers, added a layer of gorilla tape for good measure and I was able to get in another hour of tones, slaps and bases… weeeha….